Friday, November 30

Day 01: Christmas Tree Card DIY

So here's my idea: 25 days of Christmas! Of course, I had this idea a little late in the game, so it may turn into something more like 12 days of Christmas... We'll see, hah. BUT FOR DAY 01: An adorable DIY Christmas tree card to really get you in the Christmas spirit!

This was one of the ideas I had while I was supposed to be writing down other ideas... Actually, I wasn't supposed to be writing ideas either, I was supposed to be going to bed. Oops! Sometimes craftiness gets the best of me...

But here we go: A cute little tree with cork for the trunk, felt for the branches, and brads for the ornaments!

Supplies: A card + envelope (or make your own), some very thin cork (like the kind that comes in a roll!), felt (sticky-back if possible), star-shaped brads, colorful round brads, pretty paper, scissors, and glue. *Not pictured: a needle, preferably a thick tapestry or upholstery needle.

This card is super easy, and could easily be mass-produced for those of you who send out dozens of cards {over-achievers...;)}. 

  1. Cut a strip out of your cork about 2 inches or so shorter than your card {you know I eyeball-ed it}.
  2. Cut your felt into 4 pieces of various lengths {I did ~3", 2.5", 2", & 1.5"}, and one little triangle. 
  3. Glue your cork strip in the center of your card's front. I used tacky glue {because it was closest to me!}, but whatever works.
  4. Peel the back off your sticky-back felt {best invention ever} and stick the strips down from longest at the bottom to shortest at the top, pressing well on either side of the cork strip. 
  5. Poke holes into your felt & through the front of the card where you want your brads to go {both ornaments & the star}. Try to wiggle the needle around a little to make the hole wider... I actually put my star brad through the card-only, just above the felt triangle. 
  6. Carefully {but forcefully} shove the brads through the felt & card. I tried to use these cute glittery brads, but they were too thick & bendy to go through the card cleanly, so I switched to regular shiny-type brads. Close the brads on the underside of the card {you know, like how you use a brad ;)}
  7. Cut your pretty paper to fit the inside of the card {both sides}, and glue it down! Now you can add a personal message, stamp a greeting, or print out something cheery for the inside! 
Happy Holidays, and stay tuned for the rest of the {25} Days series!
let's connect ---> facebook // instagram // twitter // pinterest // rss

Thursday, November 29

Creative Flow

Beautiful "Thank You" Flowers // Thanksgiving Smiles // Dove-Love // Pine Boards for Building // Breakfast in Bed // 2-year Present // Collage for Boyfriend // Crafty Anniversary // Leftover Stuffing, mmm...

You know what the coolest thing about getting crafty is? The craftier you get, the more crafty ideas you have! I have been having oodles of ideas lately; I just wish I had more time to execute them all! I love grabbing my notebook to jot down a sudden brainstorm, only to find that as I start writing, a dozen more ides pop into my head! 

Scotty and I just celebrated our 2-year anniversary {awww} this past weekend. It was a wonderful day. :) We saw that super cute animated holiday movie Rise of the Guardians, browsed funky shops in downtown Royal Oak, painted a pottery piece together {amazing, really}, grabbed dinner at one of our favorite places, and had drinks at a dueling piano bar. I made him two collages (one of our first year and one of our second), and he gave me this hand-stamped ring from Etsy. ♥ It was a rocky year for us, but we're in such a good place right now, and I just love this fella so much. {awwww x2!}

As for me, I'm trying to find the time to make all the crafts I'm dreaming up, and hoping to pull off a holiday craft series this coming month. Fingers crossed that that works out... I'm planning to launch the pilot tomorrow. ;) I'm also considering my FINAL change of major in college, so that I can graduate with my sanity in a couple semesters, and brainstorming business-y ideas all my own! More on that later...

I've been getting a lot of surprisingly positive feedback on this little bloggity-blog lately. Not surprising because I think it sucks or anything; surprising because I didn't realize how many people actually read it! Regardless, it's super encouraging, and I appreciate the compliments more than I can say.

How is your life lately?
{If you don't have an account but want to comment, comment under "Name/URL" or "Annonymus" and leave your name! I'd love to hear from you! :))}
let's connect ---> facebook // instagram // twitter // pinterest // rss

Tuesday, November 27

Now Available: Crochet Ornament Patterns!


Well, it's only taken me months and months to set aside the time to finish laying out these beautiful patterns, but they are FINALLY HERE! For all you crocheters out there looking for a new challenge... These patterns are for you. :)

There are more patterns to come, but for now, our crochet santa and crochet penguin ornament patterns are available in our Etsy shop. I promise, they are not as difficult as they look. I imagine the most difficult part is adjusting to crocheting with thread rather than yarn {but I basically learned on thread}.

We've tried to include as many process photos as possible, particularly on the santa ornament.

Give these crochet Christmas ornaments a try this holiday season -- I promise that your loved ones will be impressed with how delicate and lovely they are!
♥  ♥  ♥
let's connect ---> facebook // instagram // twitter // pinterest // rss

Friday, November 23

Black Friday SALE!

Support handmade this holiday season! Shop Etsy!
let's connect ---> facebook // instagram // twitter // pinterest // rss

Tuesday, November 20

Storage Ottoman DIY


I love crafts. I love DIY. My biggest DIY crush? Furniture redoing/making. I can't get enough. It takes every fiber of my being to keep myself from "rescuing" every tossed out piece of furniture I see along the side of the road {boyfriend, friends, and family frown upon my frequent adoption of such items}.

I am currently in the process of replacing my hand-me-down couch, and wanted a new coffee table or ottoman to replace my cheap and wobbly IKEA table that I broke in college a few years ago. I trolled Pinterest for a while, and stumbled upon my inspiration: A coffee table constructed from four basic crates by DIY Vintage Chic! I was completely smitten with this deceivingly simple design. Even boyfriend liked the idea, and that boy is hard to please.

I loved the storage capacity and the fact that it was on casters, but I really needed something boyfriend could put his feet on... Because he could not keep his feet off my old coffee table {which drove me a little crazy}. So, again, I needed something sturdy and foot-friendly. Thus, I added an upholstered top to make this coffee table an ottoman!

Now, prepare yourself... This post has a LOT of step-by-step photos... And no full supplies photo {my bad, guys!}. BUT, I promise, this project is not difficult. If you can handle a drill {trust me, you can}, and a staple gun {easy-peasy}, you can do this project!

Here's what you'll need:
To build: {4} wooden crates, {2} 8' 2x4s (or other beam wood), {4} 2" casters w/screws, {8} corner brackets w/screws, {12} 1.25" wood screws, {4} 2.5" wood screws, {4} 1" wood screws, drill w/drill bit & driving bit

To upholster: sheet of mahogany underlayment (or other sheet wood that is NOT plywood), 2"-thick foam, polyester batting, upholstery fabric of your choosing {note: materials amounts depend upon the size of your crates, but you need enough to cover your table}, heavy duty staple gun w/staples, {5} make-to-match buttons, polyester upholstery cord, upholstery needles, scissors, yardstick/tape measure

To paint: semi-gloss paint+primer of your choosing, paint brush, drop cloth

**I got my crates from Michael's using those wonderful 50%-off coupons, so my crates were less than $7 a piece (gotta love coupons!). They each measured 9.5" deep x 18" long, and I will be using those measurements throughout the post. If you use different crates, be sure to adjust your measurements accordingly.


Build the Structure:
  1. Arrange your crates like so: Place one crate on the floor/work surface so that the opening is facing down. Place a second crate on top of the first crate so that the handle-end is down towards the floor, against the back of the first crate. Make sure the edges of second crate are flush with the first. 
  2. Drill three pilot holes {in the arrangement shown} big enough for your screws using your drill bit. This will help prevent wood-splitting. You are drilling into the handle-end of the second crate (through to the back of the first crate), towards the floor. 
  3. Drive 3 1.25" screws (into your pilot holes) through the two crates with your driving bit, securing the second crate to the first. 
  4. Rotate your crates so that the open end of the second crate is facing downward, arrange a third crate on top of the second just as you did before, and secure the two together with screws. Repeat for the fourth crate. Rotate a final time and secure the first crate to the fourth, so that all crates are secured. Your final arrangement is shown in Photo #4, looking down at the crates. 
  5. Using your 2x4s, build a base frame. **I had my 2x4s cut at Home Depot, so if you don't have a saw, that's an option! Both Lowes and Home Depot do complimentary cuts, just tell them what size pieces you need! I used 2 pieces that were the full length of the table (9.5" + 18" = 27.5") and 3 pieces that would fit between those pieces. To figure out that measurement, multiply the width of the boards by 2 (since there are 2 boards), and subtract that number from the length of the table (27.5"). In this case, a 2x4 is about 3.5" wide, so 3.5" x 2 = 7", and 27.5" - 7" = 20.5".** So, you'll need 2 pieces @ 27.5" and 3 @ 20.5". 
  6. Arrange your pieces in a square with long pieces opposite one-another and short pieces opposite one-another, making sure that the ends of the long pieces are flush with the edges of the short pieces. Using your drill, corner brackets and screws, attach the boards at each inside corner as seen above. Screws should drill into the soft pine boards relatively easily, although you may need to tap them gently with a hammer to get them started. 
  7. In the pictures above, my frame is a simple square, but for added support or stability, I added a third short-piece (20.5") across the middle. I used a counter-sinking drill bit and long wood screws, but for ease and consistency, you can use 4 more corner brackets to attach this center beam to the 2 outside pieces it will line-up with. 
  8. This step is two-fold: Attach the frame to the crates and add your casters. First, with your table upside down on the floor, align your frame with the crates (shown in Photo #5). Be sure your frame is flush with each corner, and drill a pilot hole in each corner with your drill bit; you are drilling through the 2x4 and into the underside of the crate. Insert your 2.5" screws into your pilot holes and drive screws through the frame, into the crates (screw is shown next to the caster in Photo #8). Now place a caster in each corner and attach to the frame using screws (if no screws were provided, use screws ~1" long). 
At this point, your table will look like this! The original post from DIY Vintage Chic stained the wood and made a small "crate" for the middle to fill with wine corks. If you like this look, finish it off with paint, stain, or a simple sealant! Just beware that it is not foot-friendly. As soon as I got to his point, boyfriend had his feet up on the top of the crates and the wood was visibly bowing... Not a good sign (I told you he can't keep his feet off my tables). So, on to the upholstery!

Upholster a Top:
  1. You will need a thin sheet of wood for your top. I originally tried plywood because it's super cheap, but it was so hard that all my staples were buckling... So I found a sheet of (even cheaper) mahogany underlayment over by the molding at Home Depot. I had the 4'x4' sheet cut and ripped into a 28" square at the store. This way, I would have a little bit of overhang on my finished ottoman. Purchase enough foam to cover your wood (the foam at Joanns was only 24" wide, so I had to supplement with 3" of extra foam and a little polyester fiberfill), and piece it together on top of the wood sheet. 
  2. Using a yardstick or tape measure, draw your diagonals (from corner to corner) across the foam with a marker. Where the diagonals meet is your center. Measure out 5" from the center towards all 4 sides and mark an "x."
  3. Using scissors and your fingers, dig out a little hole in the foam at the center and at each "x" (the "x" still visible in Photo #3 was mismeasured). 
  4. Lay two layers of batting over your foam so that there is enough overhang on each side to staple it to the underside of the wood. Carefully and quickly flip your wood, foam, and batting over, so that the whole top is upside down but still aligned. Staple your batting around the perimeter of the wood sheet, working opposite sides in sequence (left side, then right side // then top, then bottom) and pulling the batting tight. For more pointers, refer to this earlier post: DIY Upholstered Trunk. Finally, repeat the process in step 2 on your wood sheet, and drill small pilot holes at the center and the 4 x's. I have circled these holes in Photo #4 as they were difficult to see, and sketched the diamond tufting pattern we are creating as well. 
  5. Flip your top over again so that the batting is facing you. Feel around the batting/foam with your fingers to find the holes you dug out previously. Use your scissors and fingers to push the batting down into the holes as much as possible, cutting some batting out if necessary. Push your long upholstery needle through the hole from the wood-side to verify that the hole in the wood matches up with the hole in the batting/foam and make any necessary adjustments. Again, I've circled these holes in Photo #5. 
  6. Cover your buttons in your upholstery fabric by following the instructions on your button package.  Thread a piece of polyester cord {about 16" for plenty of slack} through your button. Next, thread BOTH ENDS of the cord through your needle as shown in Photo #6. Drape your fabric over the batting so that it is square with the top and there is excess on each side for stapling. Locate the holes in the batting/foam with your finger, and push your upholstery needle through the fabric, through the hole in the batting/foam, and through the hole in the wood. **Note: Finding the hole in the wood may be tricky... I stabbed myself about a zillion times and it took quite a while... Try to push the needle through the batting as straight and perpendicular to the wood as possible, and wiggle it around to find the predrilled hole in the top. Be patient and careful!
  7. When you have pulled your cord through the hole in the wood, push the button against the wood as hard as you can with your dominant hand {my right hand}, and simultaneously pull the cord as tight as you can with your opposite hand {my left}. Then quickly grab your staple gun and staple the cord down in a zig-zag pattern as shown in Photo #7, keeping the cord pulled as tight as possible. Repeat steps 6 & 7 for each button. 
  8. When all your buttons are secured, flip the top over and make sure the fabric is tufted and pleated to your liking between the buttons. Then flip the top back over and staple your fabric down around the perimeter just as you did your batting. Again, refer to my earlier upholstery post for my details: DIY Upholstered Trunk.

Now your table has become an ottoman! Make sure your lid fits and is lovely. I actually like the look of the unfinished wood, but the couch I'm planning will be painted, so I wanted the ottoman to match. So... Painting!

Finish the Ottoman:
  1. Lay down a drop cloth to protect your work surface. I learned this trick from my mom a long, long time ago: Use a vinyl table cloth as a drop cloth. The vinyl will act as a plastic drop cloth, but it's less slippery and flimsy, and in this case, had a cotton-back that stuck to the carpet and kept it from sliding all over!
  2. Brush your paint into all the crevasses that will show. I didn't bother painting the top, bottom, or middle of the ottoman, as those surfaces wouldn't be visible. I only did one coat, because I wanted a less-than perfect finish, but paint according to your preference. 
  3. Once paint is dry, trim excess fabric and cording ends off of your top and lay it upside down on the floor. Carefully flip your crates upside down on top of the upholstered top, lining up the corners as best you can {keeping in mind the slight overhang}. 
  4. At each corner, drive a 1" wood screw through the top of the crate down into the wood sheet of the top, using your drill. If you have trouble with the wood splitting, back your screw out and drill pilot holes.
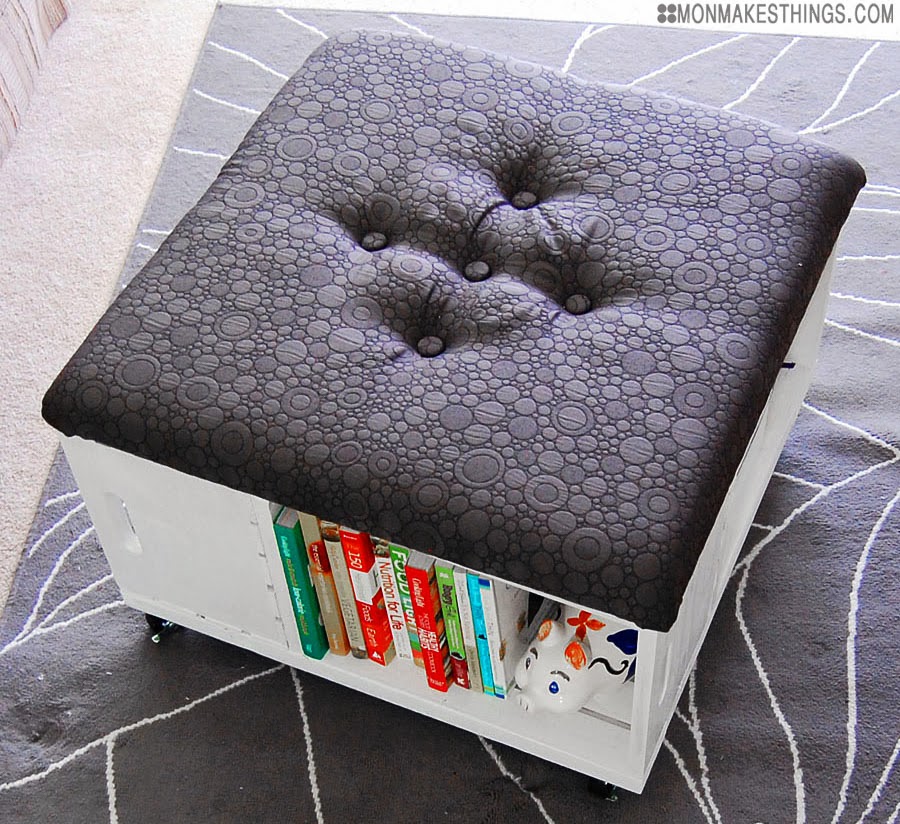
Flip the whole thing right-side-up and admire your work! Then start filling it with all kinds of goodies... Books, magazines, project boxes, decor... Fill that baby up! 

But seriously, look at that! A totally doable, custom furniture piece that boyfriend can put his feet on! :) If you give this a try, I'd love to see! 
let's connect ---> facebook // instagram // twitter // pinterest // rss

Friday, November 16

Soy Candles DIY

I've heard nothing but good things about soy candles. I hear they're clean burning and have air purifying effects on your home. I have no idea if that's true of course, but I like them regardless. And thanks to my brother's wonderfully creative girlfriend, I recently learned how to make my own!

It's really pretty simple, but after a lot of experimenting, I've got it down to a sort of science.

Here's what you'll need: 
Soy wax flakes, scented oils, a glass measuring cup, wicks (and wick clips if needed) of your choosing, wax adhesive, an assortment of candle holders, jars, and so forth
Not pictured: a plastic spoon, scissors, pot holder, paper towel

The wax is reasonably inexpensive. I got a 4 lbs. box at Michael's that was $20 regular price, but used a 50% off coupon and got it for $10 {score!}. They also sell 2 lbs. packages at Hobby Lobby for $10 regular price. I've never used wax blocks, and I'm sure it's doable, but would be more labor intensive and the melting time would be different.

The oils are the most costly, primarily because it takes a good amount of oil to really make the candle smell good, but if you can find a big bottle and use a coupon, it's not so bad. There are 3 different oils pictured above: a little bottle of peppermint, a little bottle of vanilla, and a big bottle of cinnamon. I got the cinnamon on clearance at Hobby Lobby for a steal at $5. I like the peppermint a lot because it's a stronger smell than the vanilla, so it doesn't necessarily take as much oil. BUT, I suggest trying a few different kinds to see what you like!

Start by preparing your candle holders and jars. I've used an assortment of containers, but what I have pictured includes a set of tea light holders from IKEA, a few votive holders from Target, a large mason jar, and a small mason jar. I love the look of making candles IN candle holders, and so far they've burned really, really well. I love the mason jar look too; it all depends on your taste. They also sell candle molds, but I have not used those myself.

They sell a variety of wicks in craft stores, but just be sure to read the packaging. The wick pictured above is made for soy candles and works really well. The packaging states that it burns candles 2.5 - 3" in diameter, so pay attention to that. I've also used wood wicks, but again, read the packaging. You may need to double the wood wicks (if they do not come doubled already) before securing them in the wick clips; and be aware, the wood wicks burn differently than traditional.
  • Step 1: Apply a small, pea sized amount of wax adhesive to the bottom of the wick clip, and press the wick securely onto the bottom center of your container, making sure that it is pretty well stuck. This will keep the wick from moving around when you pour in the wax. {note: if you are using wood wicks, trim them to your desired height before placing them into containers}
  • Step 2: Measure out about 2 cups of wax flakes. The wax will halve itself when it melts {2 cups solid = 1 cup melted}. 

  • Step 3: Microwave wax flakes for about 2.5 minutes; some chunks of wax may still be floating around your measuring cup, but that's okay, they'll melt. Use a plastic spoon to stir the wax until all the chunks melt.
  • Step 4: Measure out a spoonful of whichever oil you're using and mix it into the melted wax. Stir the wax well, and check that you can smell the oil. If it isn't strong enough, add more oil a half-spoonful at a time.
  • Step 5: Pour your melted wax into your container(s) being careful not to drown the wick. Like I said, 2 cups of solid wax yields 1 cup of melted wax. Obviously it depends on your container, but it took 2 cups of melted wax {4 cups solid} to fill my large mason jar, 1 cup of melted wax to fill 2 small mason jars, 1 cup of melted wax to fill all 3 tea light holders, and 1 cup of melted wax to fill my votive holders.

  • Step 6: Pound candle holders onto your counter {or other hard surface} in a downward motion. This will help force any air bubbles in the wax to the surface. Skipping this step can result in an uneven surface once the candle solidifies {you can see this on the finished photos of the gold votive holder even though I swear I did this step... gives it some handmade charm, I say!}. 
  • Step 7: Allow wax to harden. I am perpetually impatient, so I always stick my candles in the fridge or freezer. Just make sure that they are sitting on a level surface and that the wicks are centered and upright. The wicks in my votive holders were leaning a bit, so I sandwiched them between 2 plastic knives to hold them in place. 
  • Step 8: Trim your wicks. Traditional wicks can be trimmed to about 1/4" once the candles have hardened {wood wicks should be trimmed before placing them in the container, as they are more difficult to cut cleanly}.
Light & enjoy! Below, you can see a small mason jar candle with a traditional (non-soy) wick, a red votive holder using a soy wick, and a gold votive holder using a wood wick. See how differently the wood wick burns? The non-soy wick works okay, but definitely does not burn as effectively as the soy wick.

They smell so good and are so easy to whip up! These would look great on a Thanksgiving table, or around the house as decor. And I love that the containers are reusable. :) When the wax burns all the way down, pop the wick clip out, clean the bottom, and pour a new candle!

If you make some candles of your own, drop me a link in the comments! I'd love to see!
let's connect ---> facebook // instagram // twitter // pinterest // rss

Thursday, November 15

Turkey Day First Timer

It's hard to believe that Thanksgiving is already only a week away, but that's what the calendar says. At some point I managed to volunteer myself for Thanksgiving dinner-making duty, and I mean, I'm pretty excited about it.

But I'm also nervous and a little freaked out about it. Don't get me wrong, I have a good amount of confidence in my cooking skills, but I am not so great at the whole getting-everything-to-be-ready-at-the-same-time thing... And cooking meat wigs me out a bit. I hate how slimy it is, blehh...

But I'm mostly nervous about whether or not picky boyfriend and boyfriend's picky family will like everything... Fingers crossed that these recipes will do the trick!:

I am honestly not a big Rachel Ray fan, but all these herbs stuffed under the skin of this turkey sounds AMAZING. And totally doable for a turkey novice. 

Cranberry-Pear Sauce by Skinnytaste
I cannot lie to you, folks. I have always preferred the jellied cranberries to the real deal. What can I say?? But boyfriend prefers the real stuff, so I've decided to try my hand at a low-cal recipe from Skinnytaste that incorporates both tart cranberries and sweet pears!

Now, my FAVORITE part of Thanksgiving is the stuffing. But I have admittedly never made it from scratch. This recipe from How Sweet It Is sounds AH-mazing, using both sourdough and cornbread... AND sneaking in bacon and brown-butter? Nom nom nom... 

My stepmother used to try and feed me green beans and they were THE WORST. They were from a can and made me gag without fail. I late discovered the joy of fresh, crispy green beans and have never looked back. This recipe from Skinnytaste is supposed to turn out perfectly crisped beans sprinkled with savory parmesan cheese, yum! {Boyfriend won't eat them because they're, ya know, vegetables... But everyone else will!}

Sweet potatoes are my other favorite Thanksgiving side dish. They cater to my sweet tooth perfectly, and when they're topped with an oatmeal coconut pecan crumble and mini marshmallows? Heaven. Just heaven, folks. 

Chunky Mashed Potatoes by Budget Bytes
I am not a "creamy mashed potatoes" kind of girl. They are just not my style. I like the know that my mashed potatoes came from actual potatoes at some point, and for that reason, I dig some texture. Consider this recipe a starting point; I will likely add more herbs and definitely some garlic. 

Pumpkin Pecan Pie Bars by Steph's Bite by Bite
Boyfriend wanted me to make both a pumpkin and a pecan pie for dessert... I wanted him to pick one. Thankfully, the wonderfully talented and ingenious Stephanie of Steph's Bite by Bite already dreamt up a solution to this quandary. 

Mmm mm mm, now I just have to figure out when I can actually make all these things... I'm also serving some Zingerman's bread, making homemade cornbread for the stuffing, and helping hunt down homemade ice cream recipes for my mom and stepdad's shindig. Oh boy, oh boy...

What are you all doing for Thanksgiving? Anybody else out there daunted by the task of cooking the whole meal? Anybody call dibs on our leftovers? :) 
let's connect ---> facebook // instagram // twitter // pinterest // rss

Life, c/o Instgram


① so many boxes @ work  ② braids  ③ a "just because" rose  ④ sparkly feet on the warmest fall day   boyfriend pumps my gas {#spoiled}   panda-monium   boots & leaf piles   Halloween parties with my bestie   a car full of wood & craft supplies  ⑩ sweater tights, corduroy skirt & metallic top siders   fabric shopping is best shopping  ⑫ homemade soy candles

Life is good. I had to scrape the ice off my car this morning and put on my winter coat for the first time, but whatcha gonna' do, right? I DO live in the mitten state... 

I've got lots of crafty tutorials coming up soon.. The challenge is just getting home while the sun is still up so that I can take pretty bloggy photos. ;) 
let's connect ---> facebook // instagram // twitter // pinterest // rss
Pin It button on image hover